How to Print and Cut a Printable Puzzle Cleanly, from Paper to Cutting Order
Published · updated
Anyone who has printed a puzzle on copy paper and cut it out knows the problem. The paper is flimsy, so the pieces keep bending at your fingertips, and reaching for one pushes the piece next to it out of place. Every puzzle here can also be downloaded as a printable PDF, and taking care of a few things about paper and settings cuts down on this hassle considerably.
What’s in the two-page PDF
Click “Download printable” at the very bottom of a puzzle page to go to the download page, and get the PDF there. It is two A4 pages. Page 1 has the title, artist and date, the original image, and a credit line at the very bottom. Page 2 has the same image with cutting lines for 24 pieces drawn over it, and a thick solid border around the picture.
The pieces are rectangles without curved tabs. Because they have to be cut by hand, they are laid out to be cut along a straight grid. This is where the biggest difference from the online puzzle comes in. The pieces do not lock together, so the parts you have assembled shift easily when bumped, and since all four sides are flat, the edges-first strategy cannot work by shape. The picture is all you have to go on. How much the interlocking structure helps is covered separately in why puzzle pieces interlock.
The piece count does not always come out to exactly 24, either, because the grid is set to the picture’s aspect ratio. A very tall picture becomes 3 across × 7 down, or 21 pieces, and a nearly square picture becomes 5 × 5, or 25 pieces. Working out all 334 works the same way, about four in ten come to exactly 24 pieces, and most of the rest are 20 pieces or 25–30 pieces. A single piece is usually between 3 and 4.5cm on a side.
The thicker the paper, the better
Regular copy paper (80g) will do, but the pieces bend and are awkward to fit. It is recommended only for a one-time taste. Paper of 120–160g, such as the “heavy A4” or cardstock sold at stationery stores, makes a clear difference and gives the most satisfaction for the price. Photo paper reproduces the picture most finely, but its coating makes scissors slip. It is good for printing only page 1 to look at.
If you have no heavy paper, you can print on regular paper, glue it to thick paper or corrugated cardboard, and then cut. Surprisingly, this gives the feel closest to a real puzzle. Spread the glue thin and even, and cut only after it has dried completely. Cutting before it is dry makes the edges lift.
“100%”, color, single-sided
In the print dialog, choose “Actual size” or “100%”. If you leave the default “Fit to page”, the image is reduced once more and the pieces get smaller. The PDF already has a margin of about 14mm on each edge, so even printed at 100%, the picture will not be cut off on most printers. Switch to fit only when printing on paper other than A4.
Be sure to print in color, too. Printing in black and white removes the color clues and makes it much harder. The cutting lines are black dotted lines drawn over a white band, so they show up on dark pictures and remain in black and white. Even so, it is better to turn off ink-saving or draft mode. If the thin dotted lines fade, it gets confusing where to cut.
Avoid double-sided printing. If you print the two-page PDF double-sided, pages 1 and 2 are printed on the front and back of one sheet. With the reference image on the back of the page you need to cut, you cannot see the finished picture when it comes time to assemble.
The image files are reduced to a maximum of 1800 pixels on the long side. That is plenty for a sheet of A4, but enlarged to A3 it becomes rough.
Border, then horizontal lines, then vertical lines
If you put scissors to any dotted line at random, the paper wobbles and the lines go crooked. First cut the outer border to remove the margins and bring the sheet to a manageable size. Next cut all the horizontal lines to divide it into several long strips, then cut each strip vertically one at a time. Each cut covers only a short distance, and the pieces do not scatter.
For a 6 × 4 grid, 3 horizontal lines make 4 strips, and each strip takes 5 vertical cuts, so that is 23 cuts in total. The line, including the white band, is about 0.8mm wide, so just follow the middle of it.
A craft knife and ruler give much straighter cuts than scissors. With a child, scissors are safer, and it works well for an adult to do the cutting while the child starts with the assembling.
After it’s finished
For pictures with an aspect ratio of roughly 0.8 or more, that is, square, wide, or only slightly tall, the picture is the same width on pages 1 and 2. For these, lay page 1 down and assemble on top of it, and the positions are immediately visible. For tall pictures, page 1 is printed a little smaller, so it serves only as a reference.
Once it is finished, you can tape the back to hold it together and put it straight into a frame. The finished size is at most around 18 × 25cm, so it fits in an A4 frame.
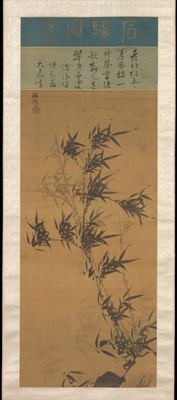 Solve this painting as a puzzle → about 5 minutes on Easy
Bamboo in the Wind is a tall hanging scroll, so it is 3 × 7, or 21 pieces. At about 11cm wide and 25cm tall, it becomes a long, narrow shape that nearly fills an A4 sheet vertically. It is a calm picture that also suits hanging on a wall.
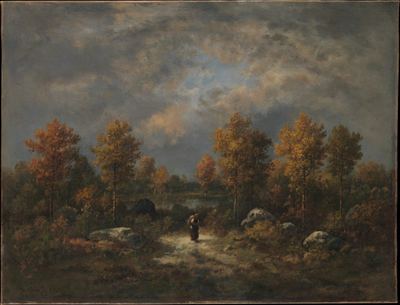
Autumn: The Woodland Pond is 6 × 4, or 24 pieces, and about 18 × 14cm when finished. Each piece is about 3cm wide and 3.5cm tall, easy enough for a child’s hand to hold.
If you solve the same picture online first and then print it, you will feel much more at ease in front of the paper. However, the online Easy level and the printable grid often differ in both piece count and boundaries, so positions you have memorized will not match exactly. Still, for someone who has already taken the picture in once, the paper pieces left after dozens of cuts will not feel unfamiliar.
Frequently asked questions
What paper should I print a printable puzzle on?
Heavy 120–160g A4 or cardstock works well. Regular copy paper (80g) makes the pieces bend, so it is recommended only for a one-time try. You can also print on regular paper, glue it to thicker paper, and then cut.
What print settings should I use?
Print at "Actual size" or "100%", in color, single-sided. "Fit to page" shrinks the image once more, black and white loses the color clues, and double-sided printing puts the reference image on the back of the page you need to cut.
In what order should I cut a paper puzzle?
Cut the outer border first to remove the margins, cut all the horizontal lines to divide the sheet into strips, then cut the vertical lines on each strip. For a 6×4 grid, that is 23 cuts in total.