Five Stones from the Ruined Temple of Amenemhat I
Published
One offering table, one lintel, two reliefs, and one inscribed block. These five pieces in the Egyptian Art section all came from a single king’s temple. According to the museum’s records, all five entered the collection in 1908–1909 through the Rogers Fund, and their findspot is recorded as the pyramid temple of Amenemhat I.
The pyramid temple at Lisht
Amenemhat I founded the 12th Dynasty of Egypt’s Middle Kingdom. His pyramid temple stood at Lisht, and The Metropolitan Museum of Art excavated the site in the early 20th century. The building collapsed long ago. Still, if you set the excavated fragments side by side, the temple slowly begins to take shape.
| Work | Material | Size |
|---|---|---|
| Lintel with the king flanked by four gods | Limestone, painted | 172.7 cm wide, 183.7 kg |
| Offering table | Granite | 166 cm wide |
| Relief with the prince Senwosretankh | Limestone, painted | 38.1 × 33 cm |
| Relief fragment with an offering list | Limestone, painted | 50.8 × 59.7 cm |
| Block with the names of two kings | Limestone | 88 cm wide |
The granite offering table
 Solve this painting as a puzzle → about 5 minutes on Easy
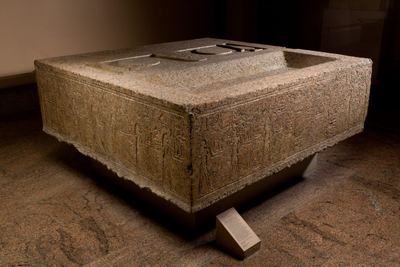
Of the five, only the Offering table from the mortuary temple of Amenemhat I is made of granite. This is where bread, beer, and meat were placed for the king’s spirit in the temple. Its top is carved with shallow basins for the offerings and with hieroglyphs, and along its sides a band of offering bearers carrying gifts runs all the way around.
Granite is one of the hardest stones in Egypt, so it was used only for royal monuments. Real food for the king was probably set on this stone, which is more than 1.6 meters wide.
Bread and meat carved into the wall
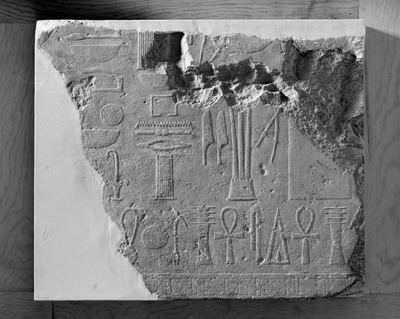
The Relief fragment from the mortuary temple of Amenemhat I shows rows of vessels, loaves, jars, and ankh signs. Lists of offerings for the king were carved in hieroglyphs like this on the walls of pyramid temples. Since each sign is itself a picture of the offering, the idea was that the wall would go on making offerings forever, even with no one there to read it.
Real bread and meat rot away. Bread and meat carved into a wall remain. For the Egyptians, writing was more than a record; it was a tool close to magic.
The prince and the four gods
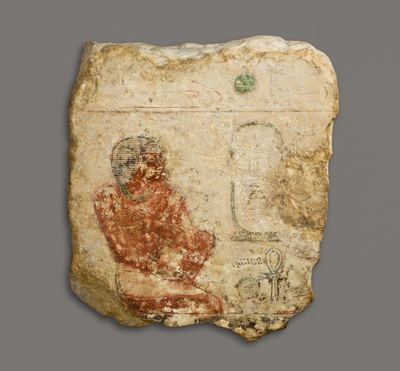
In the Relief with the prince Senwosretankh, a man with a red-painted body sits in profile, and in front of him is a cartouche with his name. The fact that his name is written in a cartouche alone tells us he was royal. It is an example of members of the king’s family appearing in temple decoration as well.
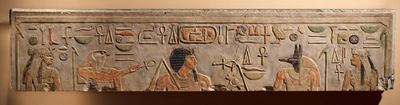
The largest and most colorful piece is the Lintel depicting King Amenemhat I flanked by Nekhbet, Horus, Anubis, and Wadjet. On either side of the seated king in the center stand falcon-headed Horus, jackal-headed Anubis, the vulture goddess Nekhbet, and the cobra goddess Wadjet. Kingship, protection of the dead, Upper Egypt and Lower Egypt: put the four gods’ roles together and the picture shows the king surrounded and protected by the gods of the whole land. The reds, blues, and yellows are still vivid, which makes you imagine how splendid the temple must have been before it fell.
Father and son, side by side
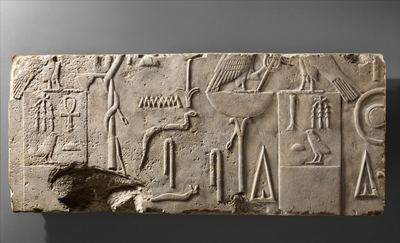
The piece that holds the eye longest is the Relief block with the names of Amenemhat I and Senwosret I. The names of Amenemhat I and his son Senwosret I are carved next to each other. The two kings are said to have ruled together for about ten years, and it is thought that the aging king put his son on the throne early to secure the succession. Evidence for this kind of co-regency is rare, and this block is counted among the few examples. Two names still carry a political decision made 3,900 years ago.
These five pieces were once part of one building. They are scattered stones now, but read side by side, the temple’s many faces return one by one: the table where offerings were laid, the lintel above the door, the reliefs that covered the walls, and even a decision of the royal house.
Start with the broken edges
Both limestone and granite have plain surfaces, so the strategy for pictures with large single-color areas works to a degree. Even so, Egyptian reliefs have sharp shadows cast by the signs and the outlines of figures, which give you more clues than you might expect. On the lintel and the two reliefs where paint survives, start with the colored pieces to get your reference points. Hieroglyphs were carved in aligned columns or rows, so look for a sign piece’s neighbors along the direction of its line. All five works have broken edges, and these jagged outlines are better clues than you would think, so it pays to start with the border. Where there is no color, sort pieces by the shadows made by the depth of the carving. Normal (about 48 pieces) is a comfortable size, and a wide piece like the lintel is worth trying at Hard (about 100).
If the statuettes of Merer were objects made for one individual’s afterlife, these temple fragments were an attempt to carve the institution of kingship itself into stone. You can read about the other conventions of Egyptian sculpture in Conventions of Egyptian statues, and tips for solving this section as puzzles in the Egyptian art puzzle guide. The temple collapsed, yet the fragments of its walls and altar each lasted 3,900 years. What its builders meant to leave behind has, if anything, become clearer after the fall.